Here is a challenge for you! If you follow all these steps carefully and complete this scavenger hunt, you will also learn a few things about appropriate citation. Just for fun, the first 3 students to (completely) finish this get a prize! Also, for all students that complete all the tasks today, another 3 names will be randomly drawn to win prizes as well!
When you have done this scavenger hunt you will be able to:
• Create your own blog post with Categories and Tags.
• Link to blogs, websites and sources of quotes.
• Add images (and give appropriate credit for them).
Make sure you number all your items!
Create a blog post on your blog with the title “October Scavenger Hunt” and answer/do the following…READ ALL THE INSTRUCTIONS AS SOMETIMES THERE ARE LITTLE THINGS THAT YOU NEED TO DO TO COMPLETE THE TASK, WHICH ARE MENTIONED THROUGHOUT THE QUESTION. (For instance, to complete #1, you need to make sure you have read the last sentence in that section, or you might make a mistake.)
Checklist for your blog post: (Read below for more details)
- 1. Link to this post (not just this Community blog, but this post on the blog).
- 2. a) What does “by-nc-sa” mean? Use your own words!
- 2. b) Find and share a link to a Creative Commons photo finding site.
- 3. Create a ‘poster’ with a Creative Commons licensed photo and a quote or a saying.
- 4. Properly quote Bloggers’ Legal Guide and find the answer to this question: “Am I free to copy facts and ideas?”
- 5. “Publish” your post with a Category ‘DM101’ and a Tag ‘scavenger-hunt’, (and other categories & tags if you want).
1. Hyperlinking and Quoting
On your post, add a hyperlink to this post, using the post title: ‘Learning to cite and source – Scavenger hunt’ as the linking term.
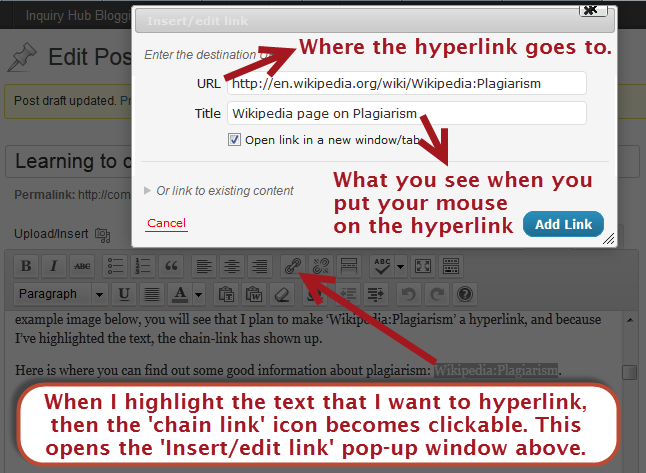
You need to use the chain-link tool, but this does not show up until you highlight some text. In the example image below, you will see that I plan to make ‘Wikipedia:Plagiarism’ a hyperlink, and because I’ve highlighted the text, the chain-link has shown up.

Here is where you can find out some good information about plagiarism: Wikipedia:Plagiarism.
Remember I was only using this as an example, you don’t need to link to wikipedia, you need to link to this post!
1b) Providing a source for information you quote:
Plagiarism can be a huge problem in school (and actually in the working world too). I think it is a problem for two complimentary reasons:
- It is easy to do! Copy -> Paste
- It is easy to catch! Click here to see how quickly I can find out that the information below is from Wikipedia and not my own words.
According to Wikipedia:
“You can avoid inadvertent plagiarism by following these three rules:
- INCITE: Cite your sources in the form of an inline citation after the phrase, sentence, or paragraph in question.
- INTEXT: Add in-text attribution when you copy or closely paraphrase a source’s words (see below for attributing public-domain sources).
- INTEGRITY: Maintain text-source integrity by placing your inline citations in a way that makes clear which source supports which part of the text.”
(Wikipdia, Oct. 11, 2012)
Notice how this quote is clearly different than my own writing. I introduce it, I indent it, I italicize it, I changed the text colour, I used quotes, and I linked to the original source. You don’t have to do all of these things, but you do want to make sure that you are properly citing and linking to the source of other people’s work.
One of the features of Edublogs is that there is a quote icon you can use after highlighting a section of text.

For this theme, it makes the text look like this. However, how this looks can change from theme to theme, so I prefer to use my own strategies above.
When using Wikipedia, I always include the date that I retrieved the information because Wikipedia text changes over time, whereas something like this blog post will likely stay the same, and the post is already dated.
I like to think of Wikipedia as ‘the first place to look for information’, but not the only place! Search the web for a good quote about plagiarism, share it in your blog post, and make sure you properly cite and source it.
*To complete part 1, the link to this blog post must open in a new tab or window!
2. Using photos.
Except for photos of my family, when I share photos online I share them with a ‘creative commons’ license:

a) What does “by-nc-sa” mean? Use your own words!
(Hint: summarize the section titled “Under the following conditions:”)
[Are you working on your blog post right now? If you have not clicked ‘Save Draft’ yet, do it now… Remember to keep saving your work!]
There are two places that I like to search for Creative Commons photos. I usually search ‘by-nc-sa’ because that’s the most popular one… but if you just searched ‘by’ (Attribution) that means you only have to share who it is by, not anything else… but even then I like to link back to the original source as a ‘thanks’ to the person for sharing.
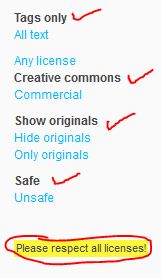
Flickr Creative Commons is a great place to search for photos you’d like to use. But some topics are filled with uninteresting photos. My favourite place is Compfight.com which uses Flickr, but somehow finds the best pictures to share. These are the settings I use for Compfight:
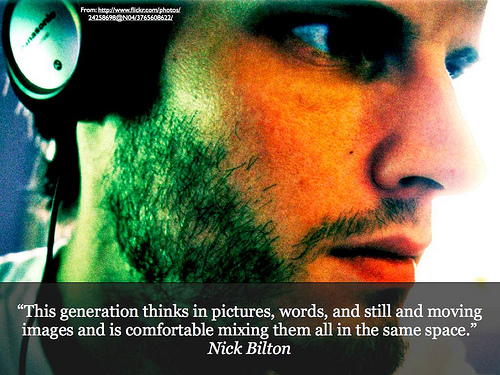
 Here is a recommended way to share a photo. First the photo:

I went to the Flickr page for this photo, clicked on the image I wanted and when I got to the page, I chose ‘View all sizes’ on the top right side of the page. I then chose a good size to download (too big and it slows your page down when loading. Too small and you can’t see it well or it gets blurry when you make it larger. 500 is a good width for blog posts!

I found the size I wanted, right-clicked on the image and saved as: Same-Space-by-George-Couros-gcouros-on-Flickr-BY-NC-SA.jpg -When I up this to my blog, it became this file: https://community.inquiryhub.org/files/2012/10/Same-Space-by-George-Couros-gcouros-on-Flickr-BY-NC-SA-ptaa6x.jpg
This is a ‘way overboard’ way to save the document, but I like doing this way so that if someone tries to copy the image from my site it comes with:
- The Title: Same Space
- The Artist: George Couros,
- The Location (where I got it): gcouros on Flickr
- The License: BY-NC-SA
- The Link: (If you click on the image, it goes to the page I got the photo from.)
Note: This photo is actually a poster that George made using a Creative Commons image that he mentions right on the image: http://www.flickr.com/photos/24258698@N04/3765608622/ and also a quote, with the person he is quoting: Nick Bilton. This is another great way to appropriately site a photo!
You can also check out the MorgueFile. These are free to use photos, with different or even no license, but even there they ask:
“The morguefile contains photographs freely contributed by many artists to be used in creative projects by visitors to the site. To acknowledge the artist’s accomplishments, we ask that you credit the photographer when possible. Any questions regarding liabilities should be directed to the specific photographer.”
So far, all you had to do for this section is answer this question: What does “by-nc-sa” mean? Use your own words!
Now, one more task:
b) Find another place that you can search for Creative Commons photos or free to use photos, and share the link. Compare this site you have found to the ones I suggest above.
3.Create a motivational poster or poster to go with a favourite quote and share it in your post.
You must use a Creative Commons photo and give appropriate credit to the photographer. If you are using a quote rather than your own words, you must give credit to the person you are quoting.
Hint: You can save an image in Powerpoint, then write your quote or phrase on it, then “Save As’ a .jpg file.
[If you have not clicked ‘Save Draft’ in a while, do it now… Remember to keep saving your work!]
4. Here is a tip from the Electronic Frontier Foundation in a post called: Bloggers’ Legal Guide:
“When can I borrow someone’s images for my blog post?
“Images are subject to the same copyright and fair use laws as written materials, so here too you’ll want to think about the fair use factors that might apply. Is the image used in a transformative way? Are you taking only what’s necessary to convey your point? A thumbnail (reduced-size) image, or a portion of a larger image is more likely to be fair use than taking an entire full-size image.”
So, taking a full copyrighted image and adding it to your blog is not considered fair use and you should not do it. You can use a smaller version or part of an image to make your point.
*Note that I linked to the page and I also -> indented the text, italicized the font and put the words in quotes. These are all ways that I show that the words above are not mine, and that I am quoting the website I linked to.
For #4, go to the Bloggers’ Legal Guide and find the answer to this question: “Am I free to copy facts and ideas?”
Link to the page, quote the answer, and then explain what this means, just like I did above for images.
5. Publish your blog post. Before you hit “Publish” create a category in the right column named ‘DM101’ and check it. We will talk more about categories later. Also, tag your post with ‘scavenger-hunt’, (Post Tags are in the box below Categories). Your blog post should have both of these for your task to be completed.
Note: This post has 2 categories: ‘DM101’, and ‘David Truss’, you can see this at the top of the post, under the title. It also has 3 tags: ‘scavenger-hunt’, ‘Creative Commons’ and ‘blogging’, you can see this at the bottom of the post. You can add more categories and tags on your post, but you must have a Category: ‘DM101’ and a Tag: ‘scavenger-hunt’.
Check over your post for mistakes and hit the ‘Publish’ button. – Way to go!
Congratulations you are done! 


