Getting Started With Your IDS

What is an Independent Directed Studies Course and how does it fit in with high school graduation?

Independent Directed Studies courses enable students to initiate their own learning and receive credits towards graduation. These courses are intended to:

  • expand course options for students
  • allow students to pursue curriculum in greater depth and further develop their passion
  • provide students with the opportunity to pursue further studies of interest.

An IDS course is an extension of one or more learning outcomes already identified in an existing Grade 10, 11 or 12 course (available for either Ministry Authorized or Board Authorized courses). The course must be rigorous, well thought-out and developed through a consultative process involving the student and the teacher. The standards for IDS courses are designed to maintain a high level of quality in the work undertaken. An IDS course is usually taken outside of the student’s regular timetable. An IDS course developed from a Grade 12 learning outcome will be awarded Grade 12 credits. Depending on the scope of the course, 1 to 4 credits may be awarded (approx. 30-120 hours).

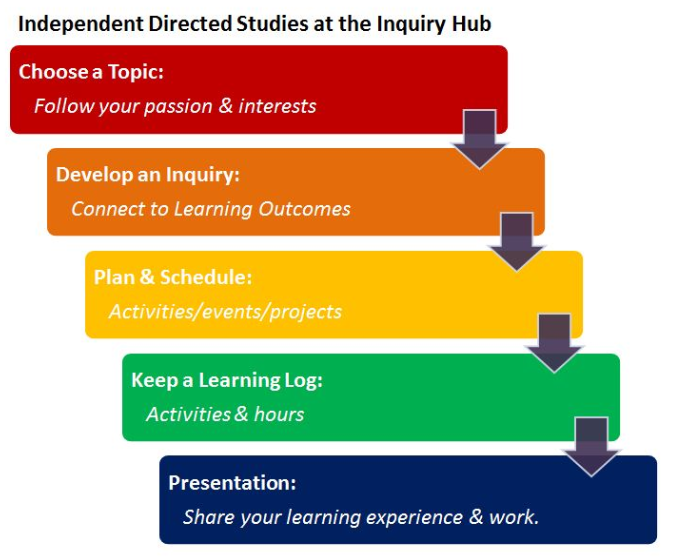
From idea to earning credits towards your high school graduation… here is a quick look at the steps to earn an IDS at iHub:

Here are a couple documents to get you started:

JED Planner

IDS Topic Proposal

Think of the JED Planner as a brainstorming tool, and the IDS Topic Proposal as the contract that you finalize with Mr. Truss.

Free, almost free, and luxury

Please read this: “Learning Space Next Steps” by David Jakes.

Think about our space(s) here at the Inquiry Hub.

In a comment, please think of and share things that we can do to improve our learning spaces.

1. Things we can do for free.

2. Things we can do for almost free.

3. Things we can do, but would probably cost a lot (luxury).

You can work in groups, but you need at least one item in each category for each person in your group.

Be sure to explain your items… not just a list, but a description of what the item is, and why or how it will improve our learning spaces.

How to…

Create an instructional or ‘How To’ video. It can be as simple as ‘How to tie a shoe lace’ or ‘How to embed a video into a blog’.

Here are some videos that are instructional in different ways:

Also check out the Common Craft videos.

This is meant to be a QUICK video (Maximum 2 minutes!)

Criteria

1a. Function – Does the video fill a need?

■ Clear organization that meets the target audience’s need. (After watching the video, someone will know exactly what they need to do.)

1b. Function – Is the video effective?
■ Instructions are well paced, being both detailed and yet still succinct. (Over-explaining is boring, under-explaining is frustrating, the video has found a good balance of the two.)

2a. Form – Visual
■ Video tells a story, (it follows a logical path, things ‘make sense’ in the order they appear). Effective use of titles (clear fonts, proper spelling and capitalization, not too simple but not too wordy), and transitions (they compliment rather than distract from the video).

2b. Form – Audio

■ Sound – Music (if used) is not copyrighted. Voice-overs (if used) or live sound is appropriate, clear and meaningful. Sound effects (if used) compliment and do not distract).


Getting Started with your Inquiry Hub Blog

Congratulations! You are now the proud owner of a blog!

This is a learning space you will use for many of your classes. It is also a public learning journal and even your portfolio space! Note that not everything has to be shared here, and you also have opportunities to create pages attached to this space.

Here are 3 steps to get you started, then some important instructions for you to get used to the ‘Back End’ of your blog (which starts with your Dashboard), and to personalize the look and feel of your new learning space.

Getting Started with your Inquiry Hub Blog

1. Go to your email and retrieve your username and password from the COL Campus email.

2. Click the link http:// YourBLOG .inquiryhub.org/wp-login.php that is in the email. Or you can access this from your blog’s side bar: (The ‘Home’ address without /wp-login.php at the end.)

3. Login using your username and password. Welcome to your blog!

This takes you to your Dashboard of your blog… that is the ‘Back End’ where you can fine tune your blog’s look and feel, and also adjust the key settings.

Things to do:

** The first task on the Dashboard is to go to Users -> Your Profile -> Change your password – KEEP IT PRIVATE! (You shouldn’t share your email password with friends, the same goes for your blog password!)

My Class -> Go to http://tinyurl.com/hubclass

…and follow the instructions. (You can adjust settings below first.)

Optional: Jetpack -> This is a great plugin that gives you stats and tools to

use, however you need to have a wordpress.com profile and this is

not essential, so try this later and focus on this space for now!


Appearance -> Themes -> Choose a Theme that you like! (Can change later)

       -> Themes -> Customize -> Change the Header (image)  etc.

       -> Widgets -> Change your sidebar – (Try adding a ClustrMap)

**Users -> Your Profile -> Change your password – KEEP IT PRIVATE!

Also add your ‘First Name’ & Last initial (in ‘Last Name’)

  -> Profile -> Your Avatar-> Use an image that isn’t copyrighted!

Settings ->  General -> You can change your Site Title and Tagline

     Timezone – Vancouver

  -> Blog Avatar-> Use an image that isn’t copyrighted!

– – – – –

Now you can delete or change your first post and make it your own!

And feel free to ask questions in the comments below…

chances are questions you have will also help other students!

Hello Inquiry Hub Students!

This Community site is set up as a Class Blog. This is a place where we will share news activities and events, as well as highlight student accomplishments. If you look over in the right-hand column, you’ll see a stream of recent blog posts from students and teachers, and also a link to your blog (once  you’ve followed the instructions below).

You will need to do the following 5 steps to connect your blog to this community blog.

Go to your blog’s address: http://YourBlog.inquiryhub.org and follow these steps:

1. Click on YourBlog’s name and choose ‘Dashboard’.

(You must be logged in using your username and password.)

2. Click on ‘My Class’.

3. Click on ‘Join a Class’.

4. In ‘Search for a site:’ type “community” and click ‘Search’.

5. Under ‘Inquiry Hub Blogging Community’ click:

    ‘Send a request to join’ …and you have joined the community!

 "Join-Community-Blog-Steps"

__________

More helpful information: When you started your blog, here is the greeting that you got. However, many of you will end up deleting or editing this automatic, first post and so you might miss out on some of these very useful links: 

Welcome to your brand new blog at COL Campus.

To get started, simply log in, edit or delete this post and check out all the other options available to you.

For assistance, visit our comprehensive support site, check out our Edublogs User Guide guide or stop by The Edublogs Forums to chat with other edubloggers.

You can also subscribe to our brilliant free publication, The Edublogger, which is jammed with helpful tips, ideas and more.