Getting Started With Your IDS

What is an Independent Directed Studies Course and how does it fit in with high school graduation?

Independent Directed Studies courses enable students to initiate their own learning and receive credits towards graduation. These courses are intended to:

  • expand course options for students
  • allow students to pursue curriculum in greater depth and further develop their passion
  • provide students with the opportunity to pursue further studies of interest.

An IDS course is an extension of one or more learning outcomes already identified in an existing Grade 10, 11 or 12 course (available for either Ministry Authorized or Board Authorized courses). The course must be rigorous, well thought-out and developed through a consultative process involving the student and the teacher. The standards for IDS courses are designed to maintain a high level of quality in the work undertaken. An IDS course is usually taken outside of the student’s regular timetable. An IDS course developed from a Grade 12 learning outcome will be awarded Grade 12 credits. Depending on the scope of the course, 1 to 4 credits may be awarded (approx. 30-120 hours).

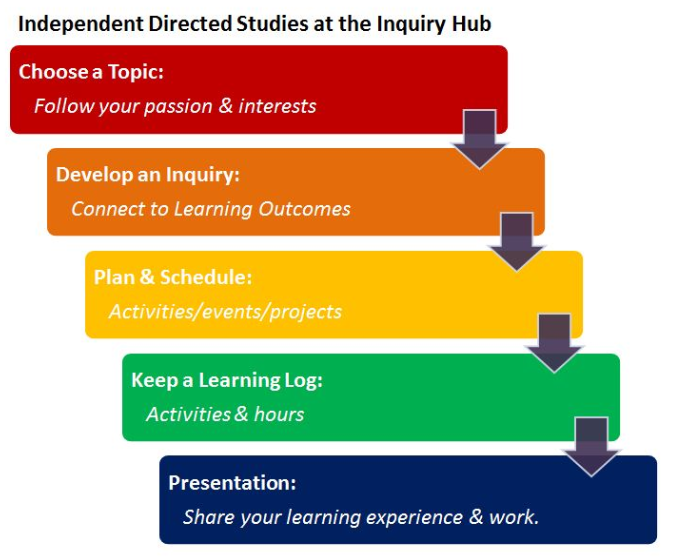
From idea to earning credits towards your high school graduation… here is a quick look at the steps to earn an IDS at iHub:

Here are a couple documents to get you started:

JED Planner

IDS Topic Proposal

Think of the JED Planner as a brainstorming tool, and the IDS Topic Proposal as the contract that you finalize with Mr. Truss.

Free, almost free, and luxury

Please read this: “Learning Space Next Steps” by David Jakes.

Think about our space(s) here at the Inquiry Hub.

In a comment, please think of and share things that we can do to improve our learning spaces.

1. Things we can do for free.

2. Things we can do for almost free.

3. Things we can do, but would probably cost a lot (luxury).

You can work in groups, but you need at least one item in each category for each person in your group.

Be sure to explain your items… not just a list, but a description of what the item is, and why or how it will improve our learning spaces.

Infographics – New and Improved

Last week we looked at Infographics we like and don’t like.

Today, we are going to pick one of two that we didn’t like and make them better!

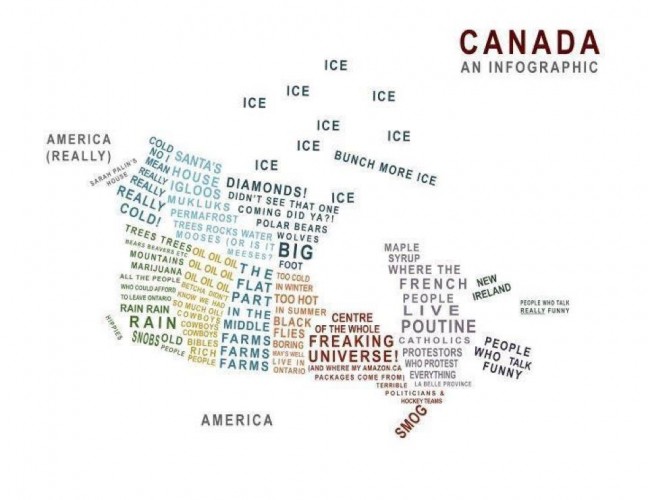
Here are the two infographics and some background to them to help guide you. You are welcome to do more research, but try to keep the purpose of the infographic the same on your improved version.

First of all, before you start to re-design, think about the message of the infographic. What ‘story’ do you want to tell, or what information are you trying to simplify or clarify?

Next, look back at the comments that your fellow students made about infographics they did like. What is it that makes an infographic interesting, compelling to read, and a good delivery of information? Think about your design, and not just the information you are sharing!

Here are the infographics, and some links to learn more. Click on the inographics to see the original versions.

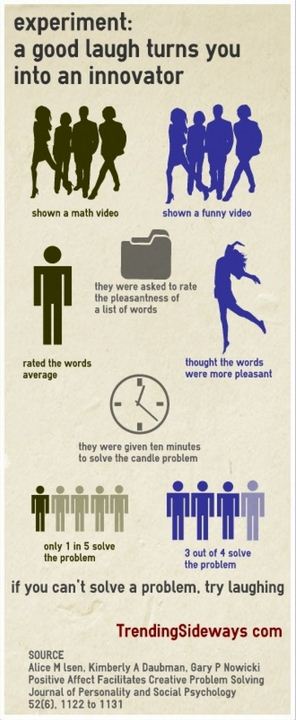
To learn more: ~You have to pay for the actual study, so no link for that:(

The Candle Problem

Images: Try searching Google for silhouette clip art or add the word people or clock or candle (these are just examples, but does this infographic even need a clock?).


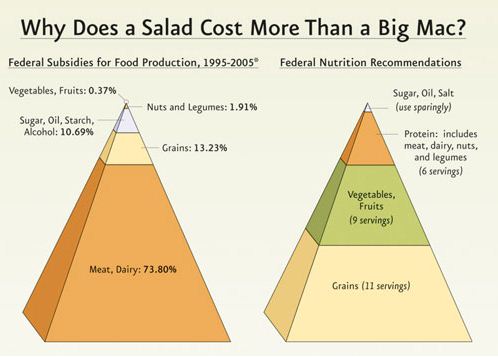
Original Source: http://www.uwec.edu/geography/ivogeler/w111/articles/Food-Pyramid-Federal-Subsidies.png

Federal Food Subsidies (In the US, which is what the infographic is about) – Notice the most subsidized item is corn/feed. This is used to feed the animals that we eat, so even though it is a vegetable that is subsidized, this is done to keep the cost of meat lower.

Images that are basic shapes like these can easily be duplicated on Powerpoint… but does this information need to be represented this way or are there more interesting ways to show this? What is confusing about this infographic? How can you change that? Also, notice the disconnect between what the two images are telling you and what the title of the infographic is. This infographic wants to tell you a good story… it just isn’t doing it well!

Work in teams of two or three and make one of these better! Share a copy of this version and your own improved version on at least one (or all) of your blogs. Be sure to include the names of everyone that worked on your new and improved infographic and share a link in the comments below. (Or share the link to this post on your post and the link-back will happen automatically.)

And of course, if you would rather choose a different infographic to improve, go right ahead… just don’t waste time looking for one when you’ve got two perfectly awful examples to improve above! 🙂

Infographics – DM101

Infographics are used to visually display information in interesting ways. They use things like images, colours, and scale to provide context and meaning to information.

Watch the video above: “Let the data set change your mindset”. See more here: The Billion Pound-O-Gram

Here are 10 Tips for Designing Infographics.

Google search and find some infogragphics. Pick one you like and one you don’t like and discuss what makes one work while another one does not. Let’s create a list of our own tips in our comments to help us with our creation of infographics. Be sure to share links to both infograpics and clearly state which one you like, which one you don’t like, and design reasons for this (rather than liking or not liking the content of the infographic).

Here are a couple places you can look for infographics: http://dailyinfographic.com/ and http://davidwarlick.com/graphicaday/

Infographics can also be funny:


Applications of Digital Literacy

DM101 – Digital Media


Course Synopsis:

In this course students will be required to demonstrate the ability to efficiently and effectively navigate the digital technologies required to accomplish specific goals and tasks. Primarily, the goal of digital literacy is that individuals are able to select the correct digital tool at the right time for the right purpose behaving ethically, responsibly and always protecting the personal security and privacy of themselves and others. There are 4 areas of study: Social Networking, Personal Learning Environments and Networks, and Principles of Digital Presentation and, Principles of Inquiry.

Rationale:

In 2012 it is imperative for citizens to be digitally literate in order to be successful contributors to their community and society. As existing and new digital technologies have become integrated into daily lives for social purposes, learning purposes, and community purposes, digital literacy is a requirement for full self-expression and participation in society. Digital literacy is defined as the ability to create, comprehend, edit, and utilize digital technologies presented through multiple formats to satisfy an intended purpose.

The course is taught through an inquiry stance requiring critical thinking, ethical decision making and reflective learning – What am I wanting to inquire in to and ..? Is it ethical/am I behaving ethically? Is it effective? Does it matter? To me? To others? Why? How do I know? Does it positively contribute to the community? What difference will my work make or do I hope to make?

The expectation is that the units of this course will not be taught in a linear fashion but outcomes will be integrated throughout learning activities in this course or integrated within other courses and once mastered, are expected to be applied across learning environments/contexts and curricular areas – integration and relevant application are paramount. It is of particular importance that the ethical uses of information – copyright, privacy, plagiarism and digital citizenship are at the forefront throughout the teaching of this course.

Principles of Social Networking:

Unit 1:   In this unit students will analyse and evaluate their current digital footprint and continue to develop a digital footprint that is appropriate to the students’ developmental age and stage by effectively using a variety of social networking tools to accomplish specific purposes. Social networking literacy involves the use of networking tools for the purpose of developing a community and within communities to then connect, inquire, share and collaborate.

Students will be able to…

  • Use a variety of social networking tools for their intended purposes
  • Analyze a task, need or goal and determine whether social networking is required/advantageous
  • Demonstrate skills essential for safety and security in the digital world; protection of passwords, personal privacy, privacy of others etc.
  • Analyze and evaluate their digital footprint and continue to develop it at a level that is appropriate to their current developmental stage
  • Demonstrate transliterate competency – using language appropriate to the audience and/or tool – i.e. abbreviations for texting, one paragraph format for email etc.
  • Express personal views and perspectives of themselves and as an online author
  • Participate in online discussions in a value-added manner – reinforcing not repeating, constructive and thoughtful criticism and feedback, offering new information and alternate perspectives
  • Analyze, evaluate, and synthesize/filter for the purpose of curating information from various sources to develop a personal “infosumption” profile

Personal Learning Environments and Networks

Unit 2:   In this unit students will demonstrate the ability to learn in the digital environment by using tools to search and research, develop and follow inquiries and investigations and, organize, synthesize and reflect in a manner suited to a variety of tasks. Student will build personal networks of learning, for the purpose of sharing, collaborating and contributing to the learning of themselves and others. Learning effectively in the digital environment requires students to generate and share original thinking and perspective development via the social construction of knowledge and understanding as reflected through a dynamic portfolio.

Students will be able to:

  • Compare and evaluate a variety of digital learning tools for their intended purpose and as they reflect personal learning preferences and purposes  – i.e. process, create, investigate, organize, evaluate, curate, synthesize, collaborate, dialogue and discourse, etc.
  • Analyze, evaluate and select the appropriate learning tool to maximize effectiveness and efficiency of accomplishing a learning process
  • Organize, evaluate, analyse and synthesize learning via a digital curating tool – such as a digital portfolio
  • Use the available learning management system to maximize the goals and purposes of a variety of  learning tasks and processes
  • Create products that demonstrate types of online collaboration (coordination, cooperation, co-planning, co-implementation, co-creation, and co-evaluation) using online collaborative tools
  • Identify their personal digital learning profile/persona  – as it reflects personal learning styles and preferences
  • Adapt an inquiry plan to own learning style
  •  Articulate and evaluate the effectiveness of their preferred tools for learning, collaborating, sharing, networking  in relation to a learning goal

Principles of Digital Presentation

Unit 3: In this unit students will learn the principles of effective design as related to communicating effectively through all modalities appropriate to the task and the audience in the digital environment. A key component of this unit is protecting and respecting the intellectual property rights of themselves and others.

Students will be able to…

  • Express the views and perspectives of others by demonstrating respect for intellectual property by understanding copyright and plagiarism
  • Express personal views and perspectives of themselves as an author and contributor
  • Create and express digital content via storytelling
  • Demonstrate the understanding that the impact of design has on visual presentation

Principles of Digital Inquiry

Unit 4:   In this unit students will work in the digital environment through the points of inquiry as articulated in the BCTLA Framework for Information Literacy and the 21st Century Learner.

Students will be able to…

  • Analyze, evaluate and select the appropriate digital tools for a particular stage of inquiry
  • Demonstrate overtly the innate human drive to being an inquiry learner – connect/wonder, investigate, construct, express and reflect
  • Effectively utilize a research process when investigating an inquiry
  • Independently and strategically manage/control inquiry skills toward a particular goal or purpose
  • Evaluate the authenticity and reliability of information
  • Seek out and engage with mentors and experts

Is there an expert in the house?

Well, that depends on how big your ‘house’ is?

In this day and age, we have an incredible ability to reach out and connect to people who are considered experts in their field of study.

This morning, your task is to leave a comment on this blog that shares the following 3 or 4 things:

1. What is your inquiry question that you are currently working on?
2. Do some research and find out at least 1, but hopefully a few, ‘experts’ that you think could help you learn more about your topic. Try to find people that you think you might be able to contact. *Think about tools you can use to contact this person: email, twitter, Facebook, friend-of-a-friend, asking parents, asking teachers…
3. Will you make an effort to contact this person or these people? Why or why not?
Optional:
4. If you have a link to some information about your inquiry that you can share (a blog post for example), please share that as well.

How to…

Create an instructional or ‘How To’ video. It can be as simple as ‘How to tie a shoe lace’ or ‘How to embed a video into a blog’.

Here are some videos that are instructional in different ways:

Also check out the Common Craft videos.

This is meant to be a QUICK video (Maximum 2 minutes!)

Criteria

1a. Function – Does the video fill a need?

■ Clear organization that meets the target audience’s need. (After watching the video, someone will know exactly what they need to do.)

1b. Function – Is the video effective?
■ Instructions are well paced, being both detailed and yet still succinct. (Over-explaining is boring, under-explaining is frustrating, the video has found a good balance of the two.)

2a. Form – Visual
■ Video tells a story, (it follows a logical path, things ‘make sense’ in the order they appear). Effective use of titles (clear fonts, proper spelling and capitalization, not too simple but not too wordy), and transitions (they compliment rather than distract from the video).

2b. Form – Audio

■ Sound – Music (if used) is not copyrighted. Voice-overs (if used) or live sound is appropriate, clear and meaningful. Sound effects (if used) compliment and do not distract).


Adding a ClustrMap to your blog Sidebar

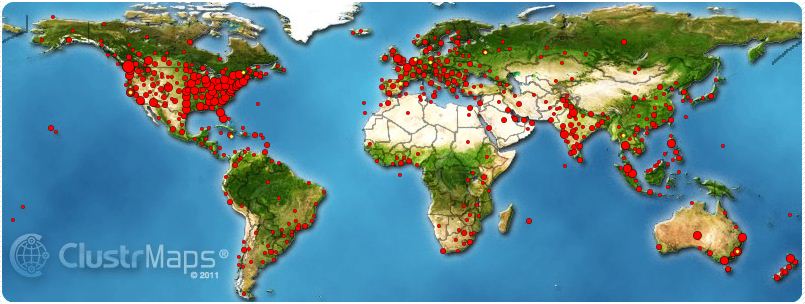
ClustrMaps are little maps that show you where in the world visitors to your blog have come from.

When you click on your map, it goes to a page that shows you your map in more detail.

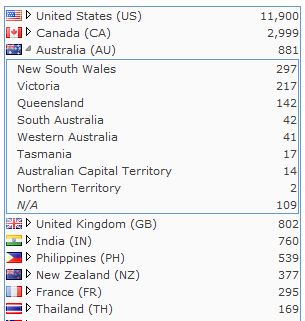
This page also gives you details about countries, states and provinces visitors came from:

—–

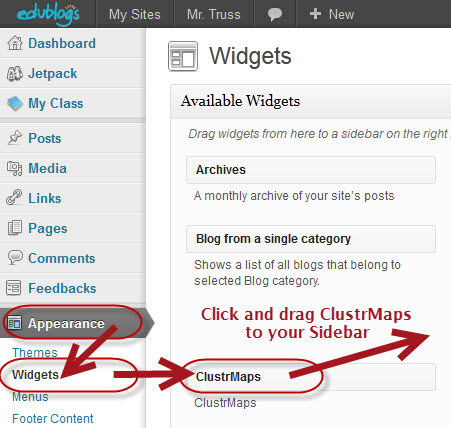
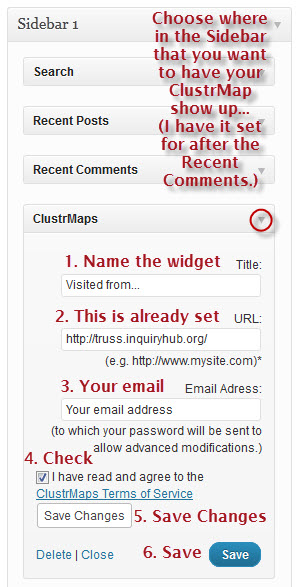
Here are the instructions to get a map onto your blog.

First, go to your Dashboard…

Then follow these instructions.

Then:

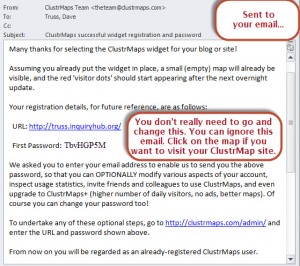
Then you will get an email, (but you don’t really need to do anything with it.)

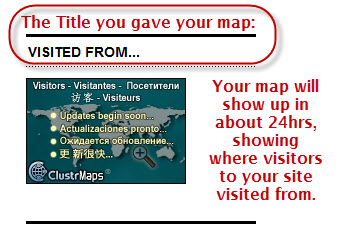
Your map will show up on your blog, and all your pages too!

Go to your blog to take a look at your map:

You are done. Start collecting dots! 🙂

Creating pages and menus in Edublogs

The first video shows you the really easy way to create a page.

1. Go to your Edublogs dashboard.

2. Move your mouse over the ‘Pages’ link in the left side navigation bar, then click ‘Add New’. (You can also click on ‘Pages’ and ‘Add New’ will appear below ‘All Pages’.)

3. Choose a name for your page (keep it short).

4. Hit publish. Congratulations you have a new page!

Creating a Page


(Link to the video in a new window)

Most themes will put the new page right into your MENU BAR at the top of your page like this:

If the page does not show up in the menu bar with your theme,

OR if you want these to be ordered in a way other than alphabetical,

OR if you want to have some pages show up as a drop-down menu option,

Or if you don’t want some pages to show up on your menu, then watch the next video.

Creating a Menu


(Link to the video in a new window)

Questions? Please comment below.